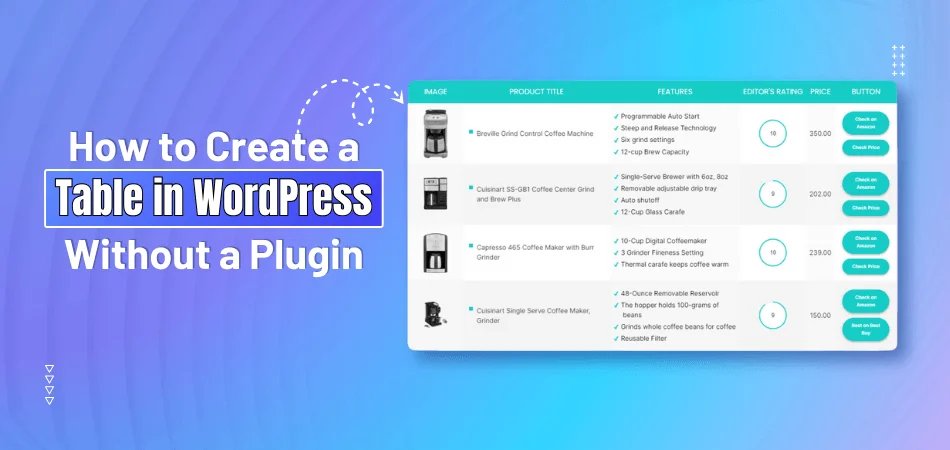
How to Add Table in WordPress Classic Editor?
Assume that you are working on a WordPress post, and you need a neat way to present some data or organize your content. You don’t want it to be all over the place, but you also don’t want to complicate things with extra coding or plugins. That’s when the table feature in WordPress Classic Editor comes in handy. So, how to add table in WordPress Classic Editor?
To create a table in the WordPress Classic Editor, you will first need to open the Classic Editor, locate the table tool in the toolbar, and specify the number of rows and columns you desire. Once you’ve set the size and other preferences, just click “Insert Table.” From there, you can edit the table and style it as needed.
The following sections of this article will provide you with more details and tips to assist you in mastering this feature. So stay tuned.
How to Add Table in WordPress Classic Editor?
Adding a table to your WordPress post or page can help you show information in a neat and organized way. It makes your content look cleaner and easier to understand. If you're using the Classic Editor, it's pretty simple to do. You just need to know where to click and what to fill in. Stick around to learn all the steps clearly and easily.

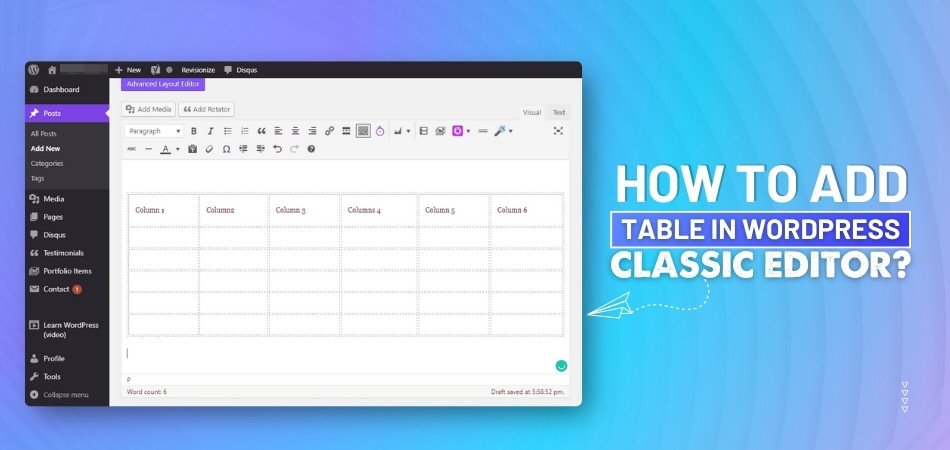
Open the Classic Editor
First, make sure you're using the Classic Editor. If you're not seeing it, you might need to install the Classic Editor plugin. Once that's set, open the post or page where you want to work. The Classic Editor will have a toolbar at the top of the text box. That’s where you’ll find the table tool.
Find the Table Tool
Look for an icon that looks like a table grid in the toolbar. This is the button you need to click to start adding tables. When you click it, a menu or a small window will pop up. That window will help you set up your table the way you want. If you don’t see it, make sure you're on the "Visual" tab of the editor.
Set Rows and Columns
In the pop-up window, you can choose how many rows and columns you want in your table. For example, if you need a list with five items, go with five rows. You’ll find that choosing the right number of rows and columns makes creating tables in WordPress posts much quicker and more organized. Additionally, you can choose how wide or tall your table should be. If you aren't sure, you can edit it later.
Choose Table Size
Besides rows and columns, you can set the overall width and height of your table. This helps your table fit better into your page. You can also choose if you want borders or background colors. Some options might look a little different depending on your theme or plugins. Just pick what looks best to you.
Add the Table
Once you’ve made all your choices, click the “Insert Table” or “Apply Changes” button. This will place the table directly into your post. You’ll now see the blank table right in your editor area. You can click on any cell to start typing. It’s just like working in a regular word document.
Edit the Table
You can add or delete rows and columns later if you change your mind. Just right-click on the table or use the toolbar options. You can also change the size or move the table around on the page. If you want to style it more, try adding bold text or background colors. It’s okay to play around until it looks right.
Style with Formatting
Use the formatting tools in the toolbar to improve how your table looks. You can change text size, make text bold, or highlight important parts. Aligning the content in the center or left side also helps with neatness. If you’re comfortable with CSS, you can add custom styles too. But even the basic tools will give you a clean and simple table.
Best Way to Confirm That You Are Using the Classic Editor in WordPress
Sometimes it’s hard to tell which editor you’re using in WordPress, especially if you're new to it. The Classic Editor and the newer Block Editor look a bit different. Knowing which one you’re using can help make editing posts easier. It only takes a few steps to check and be sure. Let’s go over some simple ways to find out.
Look at the Toolbar
When you open a post or page, check the top part of the editing area. If you see a row of familiar buttons like bold, italic, and align text, you’re probably using the Classic Editor. The toolbar in the Classic Editor looks a lot like a basic word processor. It’s simple, and all the tools are in one spot. This is one of the easiest signs to spot.
Check the Layout
The Classic Editor usually has one big box for writing your post. There are no blocks or sections popping up when you click. Everything feels like you’re typing in a normal text area. The layout is clean and not divided into parts. If your screen looks like this, you’re most likely in the Classic Editor.
Plugin Confirmation
Go to the “Plugins” section on your dashboard. Look for something called “Classic Editor” in the list. If it’s there and active, then you're definitely using the Classic Editor. This plugin is often installed to replace the default Block Editor. If it’s not installed, then you might be using a different editor.
Editor Settings
Click on “Settings” in your dashboard, then choose “Writing.” There might be an option that lets you pick between the Classic Editor and the Block Editor. If Classic Editor is selected, then that’s the one being used. This is another quick way to be sure without opening a post.
Writing Experience
When typing, if everything flows in one box without sections popping up, that’s a clue. The Block Editor breaks your content into blocks for each paragraph or element. But the Classic Editor keeps it all in one smooth space. If your writing feels more like typing in a regular document, that’s a sign you’re using the Classic Editor.
Post Editor Name
Sometimes, the editor type is shown at the top of the page. You might see something like “Classic Editor” written near the post title or in the browser tab. This can be a small hint that confirms it. Not every site shows this, but if it does, it’s a clear giveaway.
Is Adding Tables in WordPress Classic Editor a Time-consuming Process?
Yes, adding a table in WordPress Classic Editor can feel a bit time-consuming for some users. You have to open the editor, find the table tool, and then adjust rows, columns, and layout. It’s not super hard, but it takes a few extra steps compared to modern tools. If you're doing this often, it may slow you down.
There’s also no built-in table feature unless you use plugins or manually code HTML, which adds more time. Even small edits, like adding a new row or changing styles, can take several clicks. If your table needs special formatting, that can take even longer. All of this makes the process feel less smooth.
For those who want a faster and easier way, tools like Oneclicktable help a lot by skipping all the extra steps. It’s perfect for anyone who needs to add a table in a WordPress post in a hassle-free manner. You don’t need coding, and the tables are responsive and lightweight. That saves both time and effort while keeping your post looking clean.
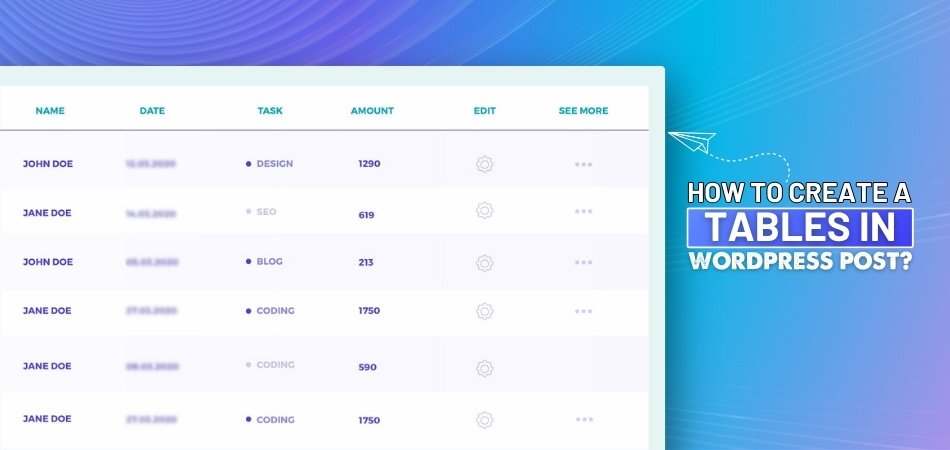
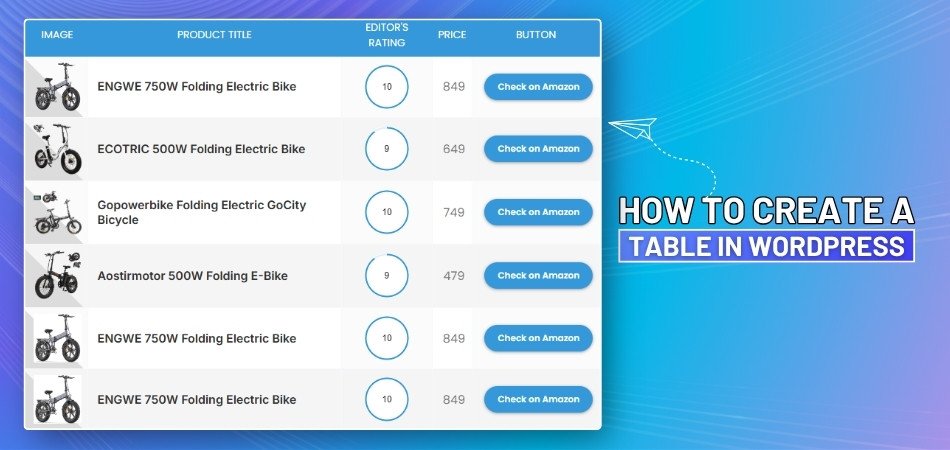
Types of Tables That Can Be Easily Added to a Post Using WordPress Classic Editor
Content can be organized and read more easily with tables. With the Classic Editor in WordPress, adding different types of tables is simple. Whether you want to show lists, compare things, or display numbers, tables help a lot. You don’t need anything fancy—just some basic clicks and ideas. Here are a few types of tables you can add easily:

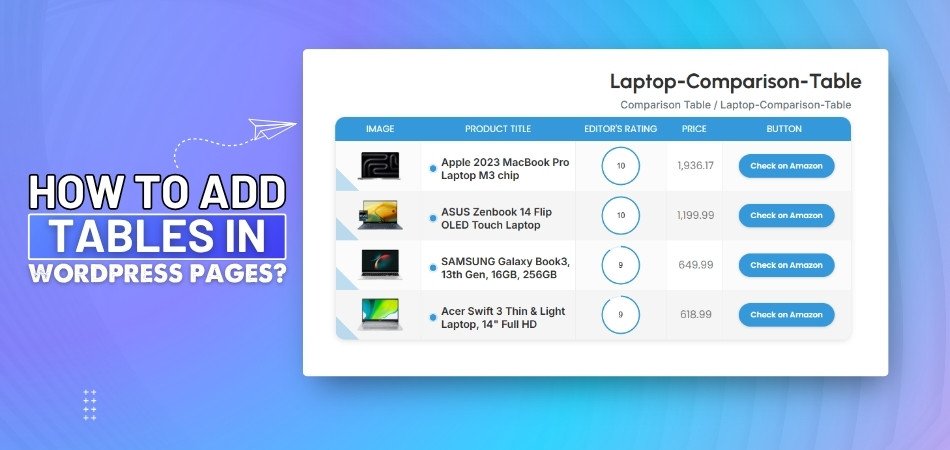
Comparison Tables
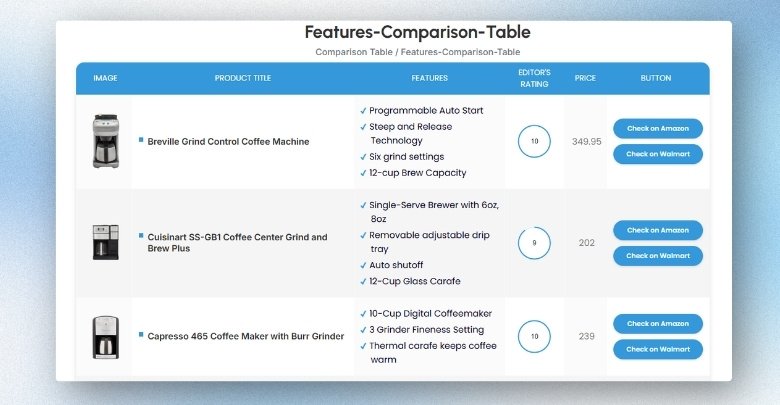
Comparison tables are used when you want to show the differences or similarities between two or more things. For example, you can compare two products, features, or even plans. Each item gets its own row or column, so it’s easy to see how they match up. These tables are neat and simple to create in the Classic Editor. Just add the items and details, and you’re good to go.
Schedule Tables
Schedule tables are perfect for showing time-based information. You can use them for class timings, event schedules, or daily plans. The first column usually lists the time, and the rest show what happens at each time. These are super useful when you want things to be clear and on time. You can update them anytime if something changes.
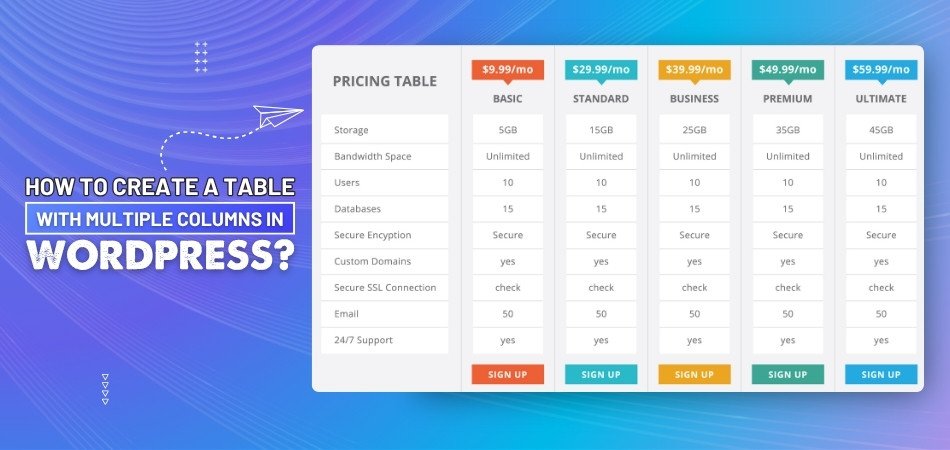
Pricing Tables
Pricing tables are often used on websites that sell products or services. They help people see the cost, features, and what’s included in each option. You can make one column for each plan and list the features in rows. This way, it’s easy to compare the value of each offer. These tables look clean and help readers choose faster.
List Tables
List tables help you break down items in an organized way. For example, if you want to share a to-do list, shopping list, or checklist, this type works great. You can use one column for the item and another for extra details like status or quantity. It’s a better option than writing everything in a long paragraph. Your readers will find it easier to read and follow.
Score or Result Tables
Score or result tables are useful when you want to show marks, rankings, or game results. You can list names on one side and scores on the other. These tables are often used in blogs about sports, competitions, or any activity with scores. You can also highlight top results using bold text or different colors. It keeps everything nice and clear.
Excel Table
An Excel table is a good choice when you already have your data ready in a spreadsheet. Copying and using Excel tables in WordPress makes it faster to add large sets of data to your post. Most of the formatting will stay, especially if it’s a simple table. This saves time and helps you work with large amounts of data quickly. Just make sure to clean it up a bit if anything looks off after pasting.
Simple Data Tables
Sometimes you just need a basic table to show facts or numbers. These simple data tables are good for things like measurements, facts, or small details. They don’t need to be fancy—just rows and columns that help organize the info. You can also add headers to show what each section means. These are perfect for everyday posts that need some structure.
What to Know Before Adding a Table in WordPress?
There are a few things you should know before adding a table in WordPress. By using tables, you can organize your content and make it easier to read. By planning ahead, you can save yourself time and effort in the future. The only thing you need is some basic knowledge. Here are some things you should keep in mind before adding your table:
Know Your Purpose
Before adding a table, think about why you need it. Is it to compare items, show a list, or display scores? When you know the purpose, it becomes easier to set up the right rows and columns. This also helps you keep the table simple and clear. A clear goal means your table will be more useful to readers.
Plan the Layout
It’s always a good idea to plan how your table will look. Think about how many rows and columns you need. You can even draw it out on paper before building it in WordPress. A rough plan helps you avoid mistakes while editing. It also saves time during the setup process.
Keep It Simple
Don’t make your table too crowded. Too much text or too many columns can make it hard to read. Try to keep your table clean and easy to follow. If it looks messy, readers may skip it. Simple tables usually work better and load faster as well.
Use Headings
Headings help people understand what each part of your table means. You can add them at the top of each column or row. Use clear and short words for your headings. This makes your table easier to read and more organized. It also looks better on the page.
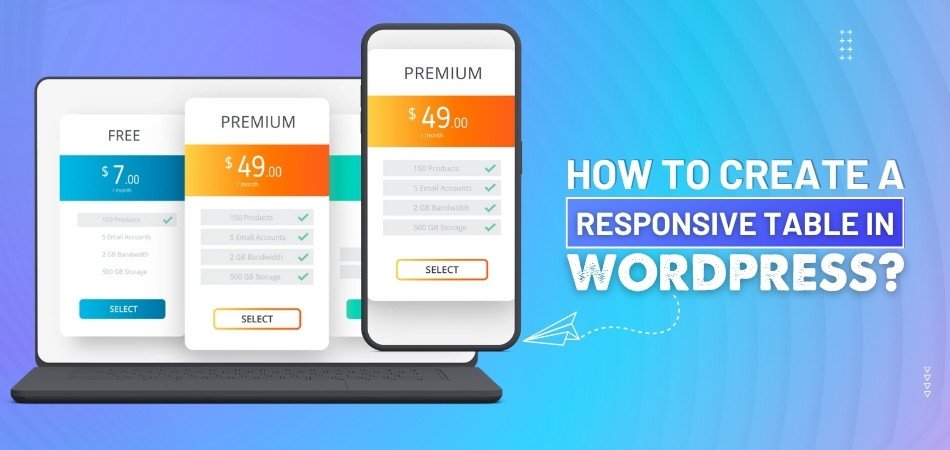
Check Mobile View
Not all tables look good on phones or small screens. Before publishing, check how your table looks on mobile. If the table is too wide, it may get cut off or become hard to read. Try to keep your table flexible so it fits smaller screens. You can also break large tables into smaller ones.
Test Before Posting
Always preview your post before hitting publish. Look at how the table fits with the rest of the content. Make sure the text is clear and nothing is out of place. If something looks off, go back and fix it. Testing helps you catch small issues early.
Commonly Asked Questions
If you're still wondering about the small details or facing little problems while adding tables in the WordPress Classic Editor, don’t worry—you're not alone. Many people have the same questions. Below, you’ll find clear and helpful answers to some of the most common questions that haven’t been covered already.
Can You Merge Cells in WordPress Classic Editor Tables?
Yes, you can merge cells in a WordPress Classic Editor table, but it depends on the table tool or plugin you're using. If your editor supports it, you can usually select two or more cells, then right-click and find the "merge" option. Merging helps when you want to make a heading span across several columns or rows.
Is It Possible to Add Images Inside Table Cells?
Yes, you can insert images inside table cells just like you do in a normal post. Click on a table cell, then use the "Add Media" button to choose your image. This is helpful when you need to show a product, logo, or any visual content next to text. Make sure to size the image properly so it fits neatly inside the cell.
How to Add Links Inside a Table?
Adding links inside a table is just like adding links to regular text. Click inside a table cell, type or paste your text, then highlight it and click the “Insert/Edit Link” button from the toolbar. You can link to a webpage, file, or even another post. It works well for linking to products, references, or downloads directly from a table.
Can Tables Be Used to Create Layouts in Classic Editor?
While tables can technically be used for layouts, it’s not the best way to design page structure in modern websites. Still, in Classic Editor, some users create simple layouts using borderless tables. For example, you can place images in one column and text in another to align them side by side. Just use it carefully, as it may not look great on mobile.
What Happens If I Paste a Table from Word or Google Docs?
Pasting a table from Word or Google Docs into Classic Editor usually works, but the formatting might not always come out clean. You might lose some styles or spacing. It's best to paste as plain text and use the editor’s table tool to rebuild the table for better control and cleaner layout.
Does WordPress Save Table Formatting Automatically?
Yes, when you add a table in the Classic Editor and click "Save Draft" or "Update," WordPress saves all formatting, including rows, columns, and any added styles. However, always double-check the table after saving, especially if you used custom colors or spacing, as some themes might slightly change the appearance.
Are Tables Created in Classic Editor SEO-Friendly?
Yes, tables in the Classic Editor can be SEO-friendly if used properly. Make sure to use table headers (like <th>) for titles and add relevant keywords where needed. Search engines read tables like regular content, so keep your table content clear, useful, and well-structured for better SEO value.
Final Thoughts
The addition of a table might seem like a small step, but it can make a huge difference in how your content looks. When done right, tables can make your posts easier to read, more organized, and visually appealing. The best part is, you don’t need to be a tech expert to do it.
Once you learn how to add table in WordPress Classic Editor, it opens up new ways to present your ideas, lists, or comparisons. With just a few clicks and simple options, you can build clean, readable layouts that keep your readers interested and on the page longer.
So go ahead—try it out on your next post! With a bit of planning and the right steps, your content can stand out without being overwhelming.

_348.jpg)